There is something so comforting about baking your own bread at home. The smell, the warmth, and that first slice with butter melting on top — it feels special every time. This Sourdough Sandwich Bread is one of my favorite homemade bread recipes because it’s soft, fluffy, and perfect for daily use.
Unlike traditional sourdough that has a thick crust and big holes, this Sourdough Sandwich Bread is lighter and softer. It’s ideal for sandwiches, toast, or even grilled cheese. The texture is smooth and easy to slice, making it perfect for families.
I started making sourdough sandwich bread when I wanted a healthier option than store-bought bread. With natural fermentation from a sourdough starter, it feels easier to digest and more wholesome. Plus, I love knowing exactly what goes into it.
If you’ve been wanting to bake your own sandwich bread at home, this beginner-friendly recipe will guide you step by step.
Why You Will Love This Recipe
Here’s why this Sourdough Sandwich Bread is so popular in my kitchen:
- Soft and fluffy texture perfect for sandwiches.
- No commercial yeast needed if using active starter.
- Better flavor than store-bought bread.
- Easy to slice and store.
- Great for meal prep and family lunches.
It’s homemade comfort food that works for everyday life.
Ingredients List
You only need a few simple ingredients to make this homemade sourdough bread:
- 1 cup active sourdough starter
- 1 cup warm water
- 2 tablespoons honey or sugar
- 2 tablespoons olive oil or melted butter
- 3 cups all-purpose flour (or bread flour)
- 1 teaspoon salt
Make sure your sourdough starter is bubbly and active before using it.
Step-by-Step Instructions
Making Sourdough Sandwich Bread may sound complicated, but it’s actually simple when you follow each step.
Step 1: Mix the Dough
In a large bowl, combine sourdough starter, warm water, honey, and oil. Mix gently.
Add flour and salt. Stir until a dough forms.
Step 2: Knead the Dough
Transfer the dough to a lightly floured surface. Knead for 8–10 minutes until smooth and elastic.
Tip: If the dough feels sticky, add a little flour. But don’t add too much.
Step 3: First Rise
Place the dough in a lightly greased bowl. Cover with a clean towel.
Let it rise for 4–6 hours, or until doubled in size.
The rising time depends on the warmth of your kitchen.
Step 4: Shape the Bread
After the first rise, gently press down the dough to remove air bubbles.
Shape it into a loaf and place it in a greased 9×5 inch loaf pan.
Step 5: Second Rise
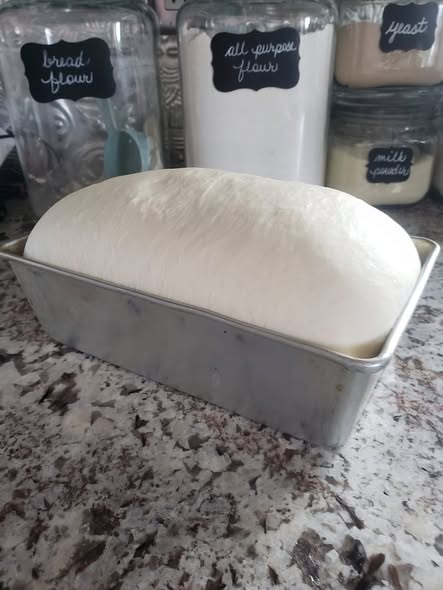
Cover again and let it rise for 2–3 hours, until it rises slightly above the edge of the pan.
Step 6: Bake
Preheat oven to 375°F (190°C).
Bake for 30–35 minutes until golden brown on top.
Tap the top gently. It should sound hollow.
Step 7: Cool
Remove from pan and let it cool completely before slicing.
Cooling helps keep the texture soft and easy to cut.
Now your homemade Sourdough Sandwich Bread is ready!
Pro Tips & Variations
Here are some helpful tips for perfect bread every time:
1. Use Active Starter
Make sure your sourdough starter is active and bubbly. A weak starter may not rise well.
2. Add Whole Wheat Flour
Replace 1 cup of all-purpose flour with whole wheat for extra fiber.
3. Brush with Butter
Brush melted butter on top after baking for a softer crust.
4. Don’t Rush Rising Time
Sourdough takes patience. Allow enough time for fermentation.
5. Avoid Over-Flouring
Too much flour can make the bread dense.
Health Benefits
This Sourdough Sandwich Bread offers more than just great taste.
Easier Digestion
Natural fermentation helps break down gluten, making it easier for many people to digest.
No Preservatives
Unlike store-bought bread, this homemade version contains no artificial additives.
Better Nutrient Absorption
Fermentation may help your body absorb nutrients better.
Balanced Energy
The natural fermentation process can help create steadier energy compared to highly processed bread.
It’s a wholesome choice for everyday meals.
Serving Suggestions
This bread is perfect for many meals:
- Classic peanut butter and jelly sandwiches.
- Grilled cheese sandwiches.
- Toast with avocado or eggs.
- French toast for breakfast.
- Simple buttered slices with soup.
I personally love it toasted with butter in the morning. It feels warm and comforting.
Storage Tips
Here’s how to keep your bread fresh:
Room Temperature
Store in a bread bag or airtight container for up to 3 days.
Refrigerator
Not recommended, as it can dry out the bread.
Freezer
Slice and freeze for up to 2 months.
Toast frozen slices directly when needed.
Frequently Asked Questions (FAQs)
1. Can I use commercial yeast instead?
Yes, but it will not have the same sourdough flavor.
2. Why didn’t my bread rise?
Your starter may not have been active enough.
3. Can beginners make this recipe?
Absolutely. Just follow the steps and be patient.
4. Why is my bread dense?
Too much flour or not enough rising time can cause density.
5. Can I make this dairy-free?
Yes. Use olive oil instead of butter.
Conclusion
This Sourdough Sandwich Bread is soft, flavorful, and perfect for everyday use. It’s simple enough for beginners but delicious enough to impress anyone at the table.
Making bread at home may feel intimidating at first, but once you try this recipe, you’ll see how rewarding it is. Fresh, homemade sourdough sandwich bread brings warmth and comfort to any meal.
Give this recipe a try and enjoy the taste of homemade goodness in every slice.
Happy baking! 🍞

Leave a Reply