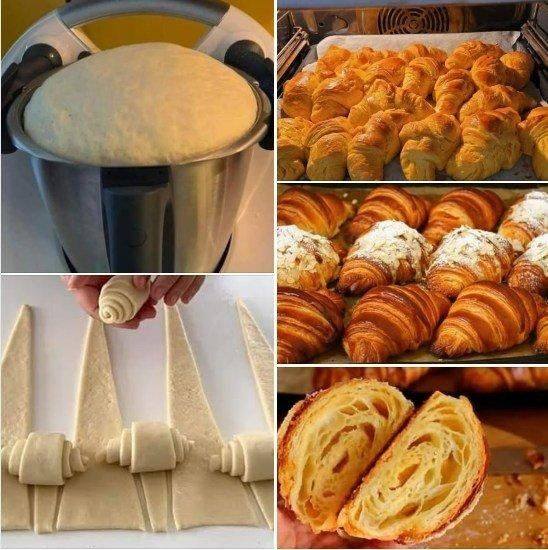
There’s something incredibly satisfying about pulling a tray of perfectly puffed pastry from the oven — especially when it’s completely gluten-free. These flaky, golden layers look straight out of a bakery window, yet they’re made right in your own kitchen with simple ingredients and a little patience. This Easy Gluten-Free Puff Pastry recipe creates crisp, buttery layers that shatter beautifully with every bite while staying light and airy inside.
Unlike many gluten-free pastries that can turn dense or gummy, this version delivers that classic puff pastry texture everyone loves. The secret lies in the lamination process: folding cold butter into dough repeatedly to create dozens of delicate layers. As the pastry bakes, steam forms between those layers, forcing them upward into tall, flaky sheets of golden perfection.
Whether you want to make sweet fruit turnovers, savory hand pies, sausage rolls, breakfast pastries, or elegant tart bases, this dough becomes the perfect foundation for countless recipes. Once you learn the technique, you’ll never feel limited by gluten-free baking again.
Why You’ll Love This Gluten-Free Puff Pastry
This recipe is designed specifically to mimic the texture and appearance of traditional puff pastry while remaining easy enough for home bakers. The finished pastry rises beautifully in the oven with clearly visible layers and a deep golden crust.
Here’s why this recipe works so well:
- Tall bakery-style puff and rise
- Crisp, flaky texture with delicate layers
- Perfect for both sweet and savory recipes
- Easy to freeze and prepare ahead
- No gummy or dense interior
- Made with simple pantry ingredients
- Works wonderfully for beginners learning lamination
The best part is how versatile the dough becomes once prepared. You can transform it into elegant desserts or comforting savory snacks with almost no extra effort.
What Makes Puff Pastry Rise?
Traditional puff pastry contains hundreds of ultra-thin layers of dough and butter. During baking, the butter releases steam, which lifts and separates the layers. This creates the signature airy texture and dramatic height.
In gluten-free baking, achieving this structure can be difficult because gluten-free flour lacks elasticity. However, using the right flour blend with xanthan gum helps stabilize the dough while still allowing those flaky layers to form properly.
Keeping the butter cold is absolutely essential. Cold butter creates distinct layers, while warm butter melts into the dough and destroys the lamination.
Ingredients You’ll Need
For the Dough
- 2¼ cups gluten-free all-purpose flour (with xanthan gum)
- 1 teaspoon fine salt
- 1 teaspoon sugar
- 1 teaspoon apple cider vinegar
- ¾ cup very cold water
For the Butter Block
- 1¼ cups cold unsalted butter
For the Egg Wash
- 1 large egg
- 1 tablespoon water
Every ingredient plays an important role. The vinegar helps tenderize the dough, while the sugar adds subtle flavor and encourages browning during baking.
How to Make Gluten-Free Puff Pastry
Step 1: Prepare the Dough
In a large mixing bowl, whisk together the gluten-free flour, salt, and sugar until evenly combined.
In a separate small bowl or measuring cup, stir the apple cider vinegar into the cold water.
Gradually pour the cold water mixture into the flour while mixing gently. Continue until a firm dough forms. The dough should feel smooth and slightly stiff but not sticky.
Shape the dough into a rectangle, wrap tightly in plastic wrap, and refrigerate for 30 minutes. Chilling allows the flour to fully hydrate while keeping the butter cold during later steps.
Step 2: Create the Butter Block
Place the cold butter between two sheets of parchment paper.
Using a rolling pin, pound and roll the butter into a rectangle about 6×8 inches and roughly ½ inch thick.
Transfer the butter block to the refrigerator for 10–15 minutes until firm but still bendable. If the butter becomes too hard, it may crack during rolling.
Step 3: Enclose the Butter
Lightly flour your work surface.
Roll the chilled dough into an 8×12-inch rectangle.
Place the butter block in the center of the dough. Fold the dough edges over the butter like an envelope, making sure all edges are sealed completely so the butter cannot escape.
Press the seams lightly closed.
At this stage, you’ve created the base for the laminated layers.
Step 4: Begin the Lamination Process
Roll the dough gently into a long rectangle approximately 8×20 inches.
Always roll in one direction to avoid damaging the layers.
Fold the dough into thirds like a business letter.
Rotate the dough 90 degrees.
Wrap tightly and refrigerate for 30 minutes.
This process is called a “turn.”
Step 5: Repeat the Folding
Repeat the rolling and folding process four more times for a total of five turns.
Between every turn, refrigerate the dough for 30 minutes. This resting time keeps the butter cold and prevents tearing.
As you continue folding, the dough develops dozens of thin alternating layers of butter and pastry.
After the final turn, chill the dough for at least 1 hour before shaping.
How to Cut Puff Pastry Properly
Proper cutting is extremely important for achieving tall layers.
Roll the dough to about ¼-inch thickness.
Use a very sharp knife or pastry cutter to slice cleanly through the dough. Avoid dragging or twisting the cutter, as this seals the edges and prevents rising.
If making filled pastries, avoid pressing the edges too tightly.
Arrange pastries on a parchment-lined baking tray before baking.
Egg Wash for a Golden Finish
Whisk together:
- 1 egg
- 1 tablespoon water
Brush lightly over the tops of the pastry only.
Avoid letting the egg wash drip down the sides because it can seal the layers together and stop the pastry from puffing properly.
Baking for Maximum Puff
Preheat your oven fully to 425°F before baking.
High heat is critical because it rapidly turns the butter’s moisture into steam, creating lift between the layers.
Bake the pastries for 18–22 minutes until deeply golden brown.
Do not open the oven early while baking. Sudden temperature changes can cause the pastry to collapse before the layers fully set.
The finished pastry should feel crisp, airy, and beautifully flaky.
Expert Tips for Perfect Layers
Keep Everything Cold
Cold butter is the most important factor in successful puff pastry. If the butter begins softening at any point, stop and refrigerate the dough immediately.
Don’t Overwork the Dough
Gentle handling preserves the layers. Pressing too hard with the rolling pin can force butter into the dough.
Trim the Edges
For the cleanest rise, trim the edges before baking using a sharp knife.
Use High-Quality Butter
European-style butter with higher fat content creates even flakier layers and richer flavor.
Chill Between Every Turn
Skipping refrigeration can melt the butter into the dough and ruin the lamination.
Ingredient Substitutions
Dairy-Free Option
Use a high-fat vegan block butter instead of regular butter.
No Xanthan Gum
Add ¾ teaspoon xanthan gum to the flour blend if your flour mix does not already contain it.
No Apple Cider Vinegar
Fresh lemon juice works well as a replacement.
Extra Golden Color
Add 1 teaspoon honey to the egg wash for deeper caramelization.
Delicious Ways to Use This Dough
Once prepared, this gluten-free puff pastry can be used in endless recipes.
Perfect uses include:
- Fruit turnovers
- Chocolate-filled pastries
- Savory hand pies
- Sausage rolls
- Puff pastry squares
- Palmiers
- Cheese twists
- Tart shells
- Breakfast pastries
- Mini appetizers
You can also prepare batches ahead of time and freeze portions for quick baking whenever needed.
Storage Instructions
Refrigerator
Wrap tightly and refrigerate raw dough for up to 3 days.
Freezer
Freeze the dough for up to 2 months.
You can also freeze pre-cut pastry pieces on a baking tray first, then transfer them into freezer bags.
Bake directly from frozen by adding 3–4 extra minutes to the baking time.
Storing Baked Pastries
Baked pastries stay fresh in an airtight container for 1–2 days at room temperature.
To restore crispness, reheat in a 350°F oven for several minutes.
Final Thoughts
Making gluten-free puff pastry from scratch may seem intimidating at first, but the results are absolutely worth it. Watching those buttery layers rise high in the oven is one of the most rewarding experiences in baking.
This recipe proves that gluten-free baking doesn’t have to mean sacrificing texture, flavor, or beauty. With careful chilling, proper folding, and quality ingredients, you can create pastry that rivals anything from a professional bakery.
Once you master this dough, you’ll unlock endless possibilities for both sweet and savory creations — all with those irresistible flaky layers that make puff pastry so special.

Leave a Reply