What This Recipe Is
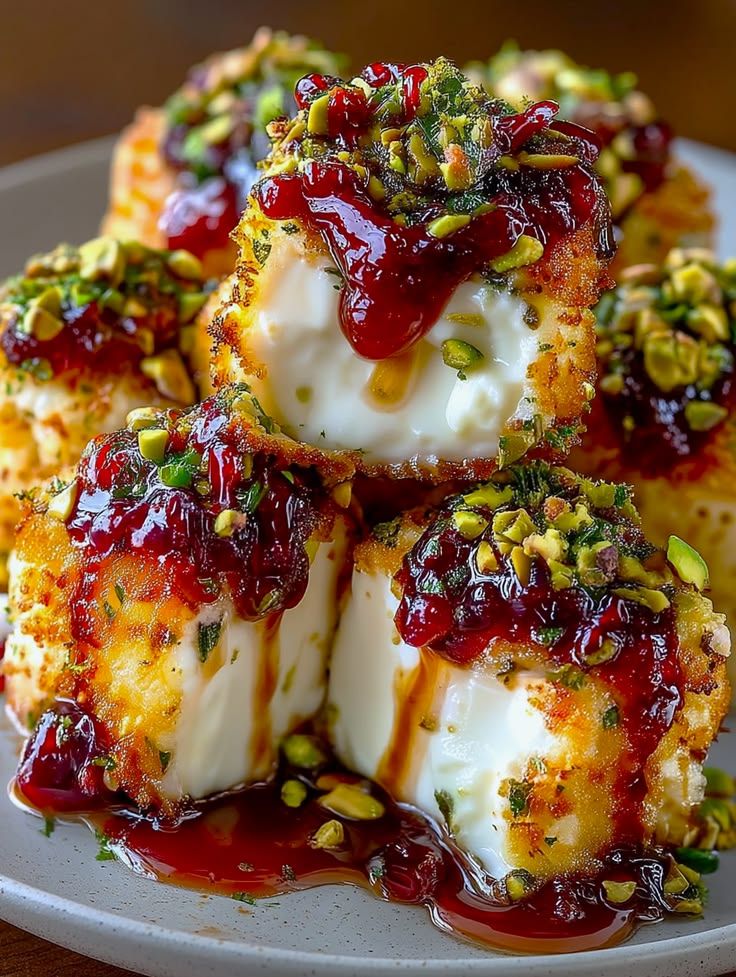
These golden bites are crispy on the outside and creamy on the inside, kind of like a mix between fried custard and cheesecake. Then they’re topped with a glossy syrup (similar to rose or sugar syrup) and crushed pistachios for that rich, slightly nutty finish.
Perfect for dessert, tea-time, or when you just wanna impress people without doing something crazy complicated.
Ingredients
For the Milk Base:
- 2 cups whole milk
- ½ cup heavy cream
- ½ cup sugar
- ½ cup cornstarch
- 1 teaspoon vanilla extract
- 1 tablespoon butter
For Coating & Frying:
- 1 cup all-purpose flour
- 2 eggs (beaten)
- 1 cup breadcrumbs (fine or panko)
- Oil for frying (vegetable or canola)
For the Syrup:
- 1 cup sugar
- ½ cup water
- 1 tablespoon lemon juice
- Optional: 1 teaspoon rose water or orange blossom water
Toppings:
- ½ cup crushed pistachios
- Extra syrup for drizzling
Step 1: Make the Creamy Milk Base
Start by pouring the milk, cream, and sugar into a saucepan. Put it on medium heat and stir until the sugar dissolves.
Now here’s where the magic happens—add the cornstarch slowly while whisking constantly. You don’t want lumps here, so keep it smooth.
Keep stirring until the mixture thickens into a custard-like texture. It should feel similar to pudding but a bit firmer.
Once thick:
- Add butter
- Add vanilla extract
- Mix until smooth and glossy
Turn off the heat.
Step 2: Set the Mixture
Pour this thick mixture into a greased tray or dish (square or rectangular works best).
Spread it evenly—about 1 inch thick is perfect.
Now let it cool:
- First at room temperature
- Then refrigerate for at least 2–3 hours (or overnight if you’re not in a rush)
You want it fully set and firm so it holds its shape when cutting.
Step 3: Cut Into Cubes
Once chilled, remove from the fridge.
Cut into:
- Cubes
- Rectangles
- Or even bite-sized squares
Try to keep them even so they fry consistently.
Step 4: Coat the Pieces
Set up a coating station:
- Flour in one bowl
- Beaten eggs in another
- Breadcrumbs in the third
Now take each piece and:
- Roll in flour
- Dip in egg
- Coat with breadcrumbs
Make sure each piece is fully covered. This is what gives that crispy outer shell.
Pro tip: For extra crunch, double coat (egg + breadcrumbs again).
Step 5: Fry to Golden Perfection
Heat oil in a deep pan to medium heat.
Carefully drop in a few pieces at a time—don’t overcrowd.
Fry until:
- Golden brown
- Crispy outside
It usually takes about 2–3 minutes per batch.
Remove and place on paper towels to absorb excess oil.
Step 6: Make the Syrup
While the bites are cooling slightly, make your syrup.
In a saucepan:
- Add sugar and water
- Bring to a boil
Once boiling:
- Add lemon juice
- Let it simmer for 5–7 minutes
Turn off heat and add rose water if using.
Let it cool slightly—it should be thick but pourable.
Step 7: Assemble Like a Pro
Now comes the fun part.
Stack or plate your fried milk cubes nicely.
Drizzle the syrup generously over the top—you want that glossy, sticky finish.
Then sprinkle crushed pistachios all over.
That contrast:
- Crunchy outside
- Soft creamy inside
- Sweet syrup
- Nutty topping
Yeah… it hits different.
Flavor Variations (Try These)
If you wanna switch things up:
Chocolate Version:
Add 2 tablespoons cocoa powder to the milk mixture.
Cheesecake Style:
Add ¼ cup cream cheese while cooking the base.
Coconut Twist:
Replace some milk with coconut milk and coat with coconut flakes + breadcrumbs.
Tips for Perfect Results
- Keep stirring the custard or it’ll get lumpy
- Chill fully before cutting (don’t rush this part)
- Use medium heat for frying—too hot = burnt outside, cold inside
- Don’t skip the lemon juice in syrup—it balances sweetness
How It Tastes (Real Talk)
First bite:
You get that crispy crunch.
Then boom—super creamy, melt-in-your-mouth center.
The syrup adds sweetness without being overpowering, and pistachios bring that slight crunch and nutty flavor.
It’s rich, but not heavy if you keep portions reasonable.
Storage & Reheating
- Store leftovers in fridge for up to 2 days
- Reheat in air fryer or oven (not microwave if you want crispiness)
Honestly though… these rarely last that long.
Final Thoughts
This recipe looks fancy, but it’s actually super doable once you break it down. It’s one of those desserts that people think you ordered from a high-end restaurant.

Leave a Reply