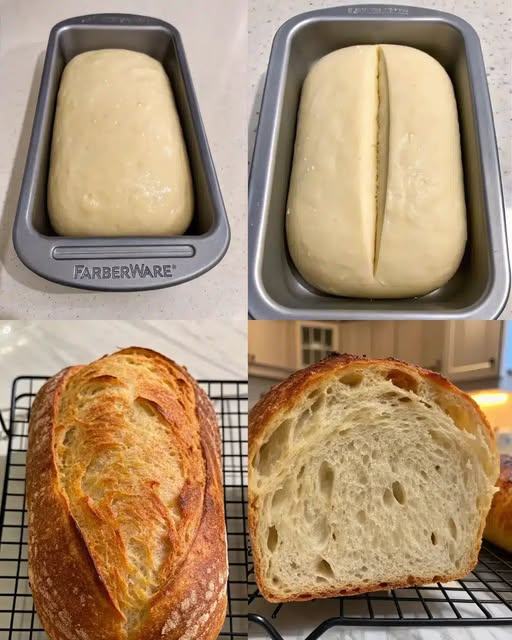
There is something very comforting about homemade bread. The smell in the kitchen. The warm slices with butter melting on top. For me, sourdough sandwich bread is not just bread. It feels like home.
I started making sourdough during a time when I wanted healthier, homemade food for my family. Store-bought bread was easy, but I wanted something more natural. When I baked my first loaf of sourdough sandwich bread, I was surprised. It was soft, light, and perfect for sandwiches. Not too sour. Not too dense. Just right.
This recipe is special because it gives you the classic sourdough flavor but in a soft sandwich-style loaf. It is great for toast, school lunches, breakfast, or even grilled cheese. Plus, it is made with simple ingredients and natural fermentation, which many people find easier to digest.
If you have an active sourdough starter and want a soft, fluffy loaf, this sourdough sandwich bread recipe is for you.
Why You Will Love This Recipe
Here are a few reasons why this sourdough sandwich bread will become your favorite:
- ✅ Soft and fluffy texture, perfect for sandwiches
- ✅ Mild sourdough flavor (not too strong)
- ✅ Made with simple pantry ingredients
- ✅ No commercial yeast needed
- ✅ Great for meal prep and freezing
It slices beautifully and holds fillings without falling apart. That alone makes it worth baking.
Ingredients List
You only need basic ingredients. Nothing fancy.
- 1 cup (240g) active sourdough starter
- 1 cup (240ml) warm milk
- 2 tablespoons sugar or honey
- 2 tablespoons softened butter or oil
- 3 cups (360–400g) all-purpose flour or bread flour
- 1 ½ teaspoons salt
Make sure your sourdough starter is bubbly and active. This helps the bread rise well.
Step-by-Step Instructions
Step 1: Mix the Wet Ingredients
In a large bowl, add:
- Active sourdough starter
- Warm milk
- Sugar or honey
- Butter or oil
Mix everything together until smooth.
Tip: The milk should be warm, not hot. Too hot can affect the natural yeast in your starter.
Step 2: Add Flour and Salt
Add the flour and salt to the bowl.
Mix with a spoon or your hands until a soft dough forms. It may feel slightly sticky at first. That’s normal.
If the dough is too sticky, add a tablespoon of flour at a time. Do not add too much. Soft dough makes soft bread.
Step 3: Knead the Dough
Place the dough on a lightly floured surface.
Knead for about 8–10 minutes until smooth and elastic.
If you are using a stand mixer, knead for about 5–6 minutes on low speed.
The dough should feel soft and stretchy.
Step 4: First Rise (Bulk Fermentation)
Place the dough in a lightly greased bowl. Cover it with a towel.
Let it rise at room temperature for 4–6 hours. The time depends on how warm your kitchen is.
The dough should double in size.
Tip: If your kitchen is cold, place the bowl in a slightly warm spot.
Step 5: Shape the Loaf
Once risen, gently punch down the dough.
Shape it into a rectangle. Then roll it tightly like a log.
Place it in a greased 9×5 inch loaf pan.
Step 6: Second Rise
Cover the pan and let the dough rise again for 2–3 hours.
It should rise slightly above the edge of the pan.
Be patient. This second rise gives the sourdough sandwich bread its soft texture.
Step 7: Bake
Preheat your oven to 350°F (175°C).
Bake for 30–35 minutes until golden brown on top.
If the top browns too quickly, cover loosely with foil.
The bread is done when it sounds hollow when tapped.
Let it cool completely before slicing.
This part is hard. But slicing too early can make it gummy.
Pro Tips & Variations
Helpful Tips
- ✔ Use an active and bubbly sourdough starter
- ✔ Do not rush the rise time
- ✔ Avoid adding too much flour
- ✔ Let the bread cool fully before cutting
Ingredient Variations
You can customize your sourdough sandwich bread easily:
- Replace half the flour with whole wheat flour
- Add 1–2 tablespoons of seeds (like sunflower or sesame)
- Use olive oil instead of butter for dairy-free option
- Add a little milk powder for extra softness
Mistakes to Avoid
- ❌ Using inactive starter
- ❌ Overbaking the bread
- ❌ Cutting while still hot
- ❌ Skipping the second rise
Small details make a big difference in homemade bread.
Health Benefits
One reason many people love sourdough sandwich bread is the natural fermentation process.
Here’s why it can be a better choice:
- 🌾 Easier to digest than regular white bread
- 🦠 Contains beneficial bacteria from fermentation
- 💪 May support better gut health
- 📉 Can have a lower impact on blood sugar compared to commercial bread
The slow fermentation helps break down some of the gluten and phytic acid. This can make nutrients easier to absorb.
It also keeps you full longer. That means fewer snacks and more steady energy during the day.
If you are trying to eat more natural, homemade foods, sourdough is a great step.
Serving Suggestions
This soft sourdough sandwich bread is very versatile.
Here are some tasty ideas:
- Toast it with butter and jam for breakfast
- Make classic peanut butter sandwiches
- Prepare grilled cheese sandwiches
- Use for turkey or chicken sandwiches
- Make French toast on weekends
I personally love it toasted with a little butter and honey in the morning. Simple and comforting.
It is perfect for school lunches, family dinners, or quick snacks.
Storage Tips
Room Temperature
Store the bread in an airtight container or bread bag.
It stays fresh for 2–3 days at room temperature.
Keep it in a cool, dry place.
In the Fridge
You can refrigerate it, but it may dry out faster.
If you do, toast slices before serving.
In the Freezer
For longer storage, freeze sliced sourdough sandwich bread.
Wrap tightly in plastic wrap and place in a freezer bag.
It lasts up to 2 months.
You can toast slices directly from frozen. Very convenient!
Frequently Asked Questions (FAQs)
1. Why is my sourdough sandwich bread dense?
It may need more rising time. Also check if your starter was active and bubbly.
2. Can I use whole wheat flour only?
Yes, but the bread will be denser. For softer texture, mix whole wheat with white flour.
3. How do I know my starter is ready?
It should double in size within 4–6 hours after feeding and look bubbly.
4. Can I add commercial yeast?
You can, but this recipe is designed to work naturally with sourdough starter only.
5. Why does my bread taste too sour?
It may have fermented too long. Shorten the rising time slightly next time.
Conclusion
Making your own sourdough sandwich bread may feel scary at first. I felt the same way. But once you try it, you will see how simple and rewarding it is.
The soft texture. The mild tangy flavor. The joy of slicing into a homemade loaf. It truly feels special.
This sourdough sandwich bread is perfect for everyday use. It is healthier, homemade, and made with love.
Give it a try this week. Your kitchen will smell amazing, and your family will thank you. Happy baking! 🍞

Leave a Reply