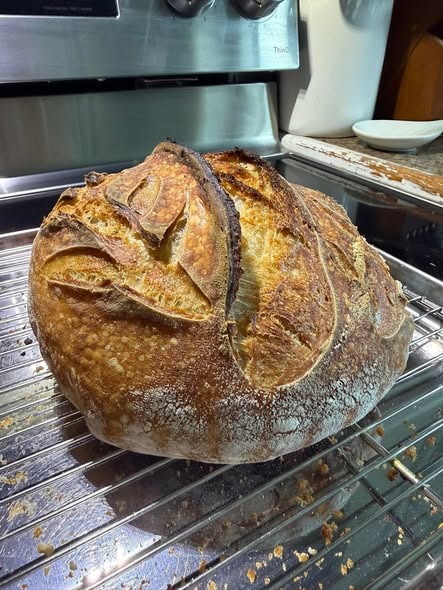
There is something truly special about a freshly baked sourdough loaf with a deep golden crust, beautiful oven spring, and a soft, airy interior. The bread shown in the image has all the characteristics of a well-crafted artisan sourdough: a crackling crust, rustic appearance, and an impressive bloom created during baking. While sourdough bread may seem intimidating at first, it is surprisingly rewarding once you understand the process. With patience and a healthy sourdough starter, you can create bakery-quality bread right in your own kitchen.
This homemade artisan sourdough bread recipe produces a crusty loaf with a chewy texture and rich flavor that develops naturally through fermentation. It is perfect for sandwiches, toast, soups, or simply enjoyed warm with butter.
Why You’ll Love This Recipe
- Crispy, golden artisan crust
- Soft and airy crumb
- Naturally fermented flavor
- No commercial yeast required
- Perfect for beginner and experienced bakers
- Great for sandwiches, toast, and homemade meals
Ingredients
For the Dough
- 100g active sourdough starter
- 350g warm water
- 500g bread flour
- 10g fine sea salt
Optional
- Rice flour for dusting
- Extra flour for shaping
Equipment Needed
- Large mixing bowl
- Kitchen scale
- Dutch oven with lid
- Dough scraper
- Banneton basket or bowl lined with a towel
- Sharp bread lame or knife
- Cooling rack
Understanding Sourdough
Sourdough bread relies on a naturally fermented starter rather than commercial yeast. The starter contains wild yeast and beneficial bacteria that help the dough rise while developing a deep, complex flavor. This slow fermentation process is what gives sourdough its signature taste and texture.
The key to successful sourdough bread is using an active starter. Your starter should be bubbly, doubled in size, and pass the float test before mixing the dough.
Step 1: Mix the Dough
In a large bowl, combine:
- 100g active sourdough starter
- 350g warm water
Stir until the starter dissolves.
Add:
- 500g bread flour
Mix until no dry flour remains. The dough will look rough and shaggy. Cover the bowl and let it rest for 30 minutes.
This resting period is known as autolyse and helps improve gluten development.
Step 2: Add Salt
After the dough has rested, add:
- 10g sea salt
Mix thoroughly by pinching and folding the dough until the salt is fully incorporated.
The dough should feel smoother and more elastic.
Step 3: Stretch and Fold
During the next 2 hours, perform a series of stretch-and-folds.
Every 30 minutes:
- Wet your hands.
- Grab one side of the dough.
- Stretch upward gently.
- Fold it over itself.
- Rotate the bowl and repeat.
Perform four sets of folds total.
Each fold strengthens the dough and helps build structure.
Step 4: Bulk Fermentation
Cover the bowl and allow the dough to ferment at room temperature for 4–6 hours.
The exact time depends on room temperature.
Signs the dough is ready:
- Increased by about 50%
- Puffy appearance
- Small bubbles visible
- Jiggles slightly when shaken
Avoid over-fermenting, as this can weaken the dough.
Step 5: Pre-Shape the Dough
Lightly flour your work surface.
Gently turn out the dough.
Using a dough scraper, shape it into a loose round ball.
Allow it to rest uncovered for 20 minutes.
This bench rest makes final shaping easier.
Step 6: Final Shaping
Lightly flour the top of the dough.
Flip it over and shape tightly by folding the edges toward the center.
Turn the dough seam-side down and use your hands to create surface tension by gently pulling it toward you.
A properly shaped loaf helps create the dramatic rise seen in artisan bread.
Step 7: Cold Proof
Place the dough seam-side up into a floured banneton basket.
Cover and refrigerate for 12–16 hours.
The overnight proof develops flavor and improves scoring.
Many artisan bakers consider this step essential for achieving the beautiful crust and texture shown in the photo.
Step 8: Preheat the Oven
Place a Dutch oven inside your oven.
Preheat to:
250°C (480°F)
Allow the Dutch oven to heat for at least 45 minutes.
A thoroughly heated Dutch oven creates steam and encourages excellent oven spring.
Step 9: Score the Dough
Remove the dough from the refrigerator.
Turn it onto parchment paper.
Using a sharp lame or knife, make one deep slash across the top.
This score allows controlled expansion during baking and creates the signature ear seen on artisan sourdough loaves.
Step 10: Bake
Carefully transfer the dough into the hot Dutch oven.
Cover with the lid.
Bake:
- 20 minutes covered
- 20–25 minutes uncovered
The crust should become deep golden brown with darker caramelized edges.
The loaf should sound hollow when tapped on the bottom.
Step 11: Cool Completely
Transfer the bread to a cooling rack.
Allow it to cool for at least 1 hour before slicing.
Although it is tempting to cut into fresh bread immediately, cooling allows the crumb to finish setting and prevents a gummy texture.
Serving Suggestions
This artisan sourdough loaf pairs wonderfully with:
- Salted butter
- Homemade jams
- Avocado toast
- Soups and stews
- Grilled cheese sandwiches
- Olive oil and balsamic vinegar
- Charcuterie boards
Its crispy crust and chewy interior make it versatile for nearly any meal.
Storage Tips
Store the bread:
- Wrapped in a clean kitchen towel
- At room temperature for up to 3 days
For longer storage:
- Slice the loaf
- Freeze in airtight bags
- Toast slices directly from frozen
Avoid refrigeration, as it can dry out the bread.
Tips for Perfect Sourdough
Use a Strong Starter
A healthy starter is the foundation of great bread. Feed it regularly and bake when it is most active.
Measure by Weight
Using a kitchen scale provides far more accurate results than measuring cups.
Don’t Rush Fermentation
Flavor develops during the slow fermentation process. Patience produces better bread.
Create Steam
Steam helps produce the blistered crust and dramatic rise characteristic of artisan sourdough.
Practice Scoring
Good scoring directs expansion and creates the beautiful rustic appearance that makes homemade sourdough so appealing.
Final Thoughts
Homemade artisan sourdough bread is one of the most satisfying baking projects you can undertake. The combination of a crackling golden crust, airy crumb, and rich flavor makes every step worthwhile. While sourdough requires patience, the process becomes enjoyable and rewarding with practice. This rustic loaf captures everything people love about traditional artisan bread and delivers bakery-quality results from simple ingredients. Whether served alongside a hearty soup, used for sandwiches, or enjoyed with butter straight from the cutting board, this homemade sourdough bread is sure to become a favorite recipe in your kitchen.

Leave a Reply