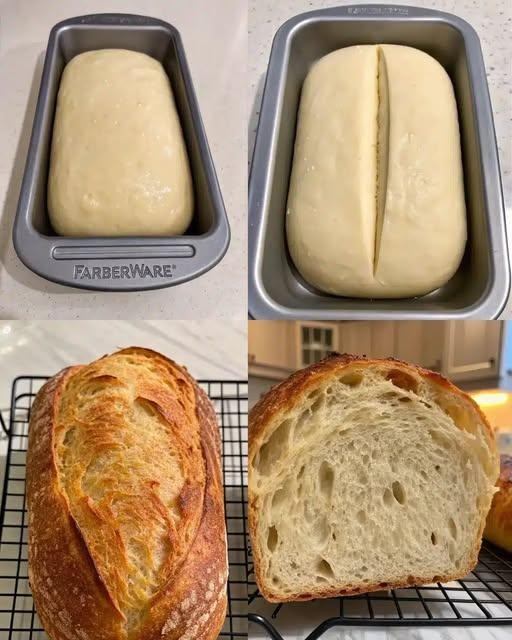
There’s something truly comforting about baking your own loaf of sourdough sandwich bread at home. The smell of warm bread filling the kitchen, the golden crust fresh from the oven, and that first soft slice covered in melting butter — it’s the kind of simple joy that never gets old. Unlike rustic artisan sourdough loaves with thick crusts and large airy holes, this sourdough sandwich bread is soft, fluffy, and perfect for everyday use. It slices beautifully, makes incredible sandwiches, and stays tender for days.
What makes this recipe extra special is the balance between classic sourdough flavor and soft sandwich-style texture. The sourdough starter gives the bread a mild tang and rich depth of flavor, while butter and honey create a tender crumb that feels light and pillowy. The result is a loaf that tastes homemade in the best possible way — wholesome, flavorful, and far better than anything from the grocery store.
This recipe has become a favorite for many home bakers because it’s simple, reliable, and versatile. Whether you’re making toast for breakfast, grilled cheese for lunch, or French toast on the weekend, this loaf works beautifully for almost everything.
Why You’ll Love This Sourdough Sandwich Bread
One of the best things about this recipe is how soft the texture turns out while still keeping the beautiful flavor of traditional sourdough. Some sourdough breads can feel heavy or chewy, but this loaf is light, fluffy, and easy to slice.
Here are a few reasons why this bread deserves a spot in your weekly baking routine:
- Soft and fluffy texture perfect for sandwiches
- Mild sourdough flavor that isn’t overly tangy
- Easy to slice without crumbling
- No commercial yeast required
- Great for toast, sandwiches, and French toast
- Stays fresh for several days
- Freezer-friendly for meal prep
Once you taste homemade sourdough sandwich bread, it becomes very difficult to return to store-bought bread. The flavor is richer, the ingredients are simple, and every slice feels fresh and comforting.
Ingredients You’ll Need
This recipe uses simple pantry staples, but each ingredient plays an important role in creating the perfect loaf.
500 g Bread Flour
Bread flour gives the loaf structure and helps create a soft yet sturdy texture. Because bread flour has a higher protein content than all-purpose flour, it develops more gluten, resulting in a taller and fluffier loaf.
100 g Active Sourdough Starter
Your sourdough starter should be active, bubbly, and recently fed. A healthy starter is essential for good rise and flavor.
300 g Warm Water
Warm water helps activate the fermentation process and makes the dough easier to mix.
40 g Honey or Sugar
Honey adds a subtle sweetness and helps keep the bread soft and moist. Sugar works well too if that’s what you have on hand.
40 g Unsalted Butter, Softened
Butter gives the bread richness and creates a tender crumb. It also helps the loaf stay soft longer.
10 g Salt
Salt enhances flavor and strengthens the dough structure.
Step-by-Step Instructions
Step 1: Mix the Dough
In a large mixing bowl, combine the active sourdough starter, warm water, and honey. Stir everything together until the starter is mostly dissolved. The mixture should look slightly cloudy.
Add the bread flour and mix until a shaggy dough forms. At this stage, the dough may look rough and uneven, and that’s completely normal.
Cover the bowl and let the dough rest for 30 minutes. This resting period, often called the autolyse stage, allows the flour to fully absorb the water and helps develop gluten naturally.
Step 2: Add Butter and Salt
After the dough has rested, add the softened butter and salt. Knead the dough until it becomes smooth, soft, and elastic.
If kneading by hand, this usually takes about 8–10 minutes. If using a stand mixer, knead for about 5–6 minutes on medium speed.
At first, the butter may make the dough feel slippery, but keep kneading and it will eventually become smooth and cohesive.
A properly kneaded dough should feel soft and stretchy without tearing easily.
Step 3: Bulk Fermentation
Transfer the dough to a lightly greased bowl and cover it with a towel or plastic wrap.
Let the dough rise at room temperature for about 4–6 hours, or until doubled in size. The exact timing depends on the temperature of your kitchen and the strength of your starter.
If your kitchen is cooler, the dough may take longer to rise. Sourdough fermentation is slower than commercial yeast, but that slow rise is what creates such incredible flavor.
During this stage, the dough becomes airy, light, and easier to shape.
Step 4: Shape the Loaf
Once the dough has doubled in size, gently transfer it onto a lightly floured surface.
Press the dough gently into a rectangle, being careful not to remove too much air. Roll the dough tightly into a log shape, creating surface tension as you roll.
Place the shaped loaf seam-side down into a greased 9×5-inch loaf pan.
This shaping step helps the loaf rise upward instead of spreading outward during baking.
Step 5: Final Proof
Cover the loaf pan loosely and let the dough rise again until it crowns about 1 inch above the rim of the pan.
This second rise usually takes about 2–4 hours depending on room temperature.
The dough should look puffy and airy when ready to bake. If you gently press the surface with your finger, the indentation should slowly spring back.
Avoid over-proofing, as this can cause the loaf to collapse while baking.
Step 6: Bake the Bread
Preheat your oven to 375°F (190°C).
Bake the loaf for 35–40 minutes until the crust becomes beautifully golden brown. The bread should sound hollow when tapped on the bottom.
For extra accuracy, use a thermometer to check the internal temperature. The loaf is fully baked when it reaches 200°F (93°C).
If the top begins browning too quickly, loosely tent the loaf with aluminum foil during the final part of baking.
As the bread bakes, your kitchen will fill with the most incredible buttery sourdough aroma.
Step 7: Cool Before Slicing
Once baked, carefully remove the bread from the pan and place it on a wire rack to cool completely.
This step is important because slicing warm bread too early can make the inside gummy.
Allowing the loaf to cool fully helps the crumb finish setting, giving you clean and beautiful slices.
Overnight Refrigerator Option
One of the best things about sourdough baking is flexibility.
If you want to bake fresh bread in the morning, you can shape the loaf, cover it, and refrigerate it overnight.
The next day, let the dough sit at room temperature until slightly puffy before baking as directed.
This overnight fermentation also deepens the flavor and adds even more complexity to the bread.
Tips for Success
Use an Active Starter
A healthy sourdough starter should double in size within 4–6 hours after feeding. Weak starters may struggle to properly rise the dough.
Don’t Rush Fermentation
Sourdough takes time. Allow the dough to rise fully for the best flavor and texture.
Use Bread Flour
Bread flour creates the softest and tallest sandwich loaf because of its higher protein content.
Butter Makes a Difference
The butter gives the bread richness and helps create a soft crumb that stays tender longer.
Honey Adds Moisture
Honey not only sweetens the loaf slightly but also helps retain moisture.
How to Store Sourdough Sandwich Bread
Homemade bread contains no preservatives, so proper storage is important.
Store the loaf in a bread bag, airtight container, or wrapped in a clean towel at room temperature for up to 4 days.
Avoid storing bread in the refrigerator, as it can dry out faster.
For longer storage, slice the loaf and freeze it for up to 3 months. You can toast slices directly from frozen whenever needed.
Serving Ideas
This soft sourdough sandwich bread is incredibly versatile and works for both sweet and savory meals.
Here are a few delicious ways to enjoy it:
- Peanut butter and jelly sandwiches
- Classic grilled cheese
- Avocado toast
- French toast
- Turkey or chicken sandwiches
- Garlic butter toast
- Breakfast egg sandwiches
- Homemade croutons
Every slice is soft, flavorful, and perfect for everyday meals.
Final Thoughts
Homemade sourdough sandwich bread is one of those recipes that feels both comforting and rewarding. It combines the rich flavor of traditional sourdough with the softness of classic sandwich bread, creating the perfect everyday loaf.
Once you bake this bread yourself, you’ll understand why so many home bakers fall in love with sourdough. The flavor is deeper, the texture is softer, and the process itself feels relaxing and satisfying.
Whether you enjoy it toasted with butter in the morning or layered with your favorite sandwich fillings at lunch, this soft sourdough sandwich bread is guaranteed to become a staple in your kitchen. One warm slice fresh from the oven is often all it takes to make this recipe a family favorite for years to come.

Leave a Reply