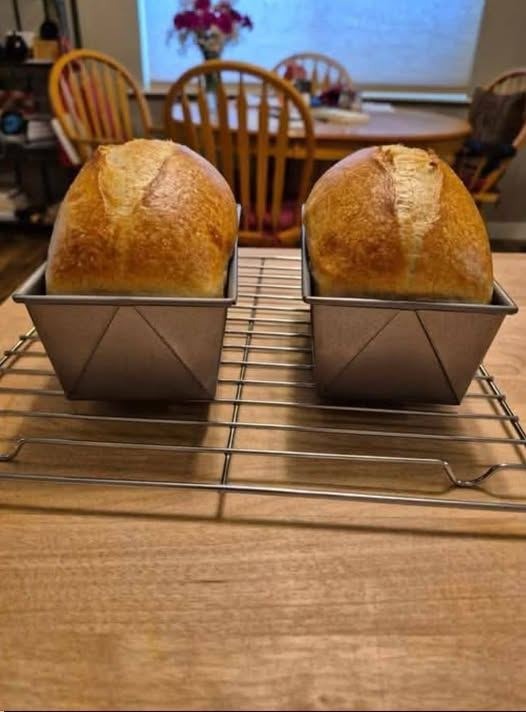
There’s something deeply comforting about a homemade loaf of sandwich bread cooling on the counter. Unlike crusty artisan sourdough boules that are all about dramatic crackling crusts and giant air pockets, sourdough sandwich bread is designed for everyday life. It’s soft enough for morning toast, sturdy enough for grilled cheese, and flavorful enough to make even a simple buttered slice feel special.
This Sourdough Sandwich Bread Recipe combines the rich flavor of natural fermentation with the soft texture people love in classic sandwich loaves. The result is a loaf that’s tender, fluffy, lightly tangy, and perfectly sliceable. It holds up beautifully to peanut butter, deli meats, egg sandwiches, or homemade jam without falling apart.
What makes this recipe even better is that it uses only a sourdough starter for leavening—no commercial yeast needed. A touch of milk, butter, and honey enriches the dough just enough to create that soft bakery-style crumb while still keeping the wholesome character of traditional sourdough bread.
Whether you’re just beginning your sourdough journey or looking for a reliable weekly bread recipe, this loaf is practical, forgiving, and incredibly rewarding to bake.
Why Sourdough Sandwich Bread Is Different
Traditional artisan sourdough bread focuses on a chewy texture, crispy crust, and large open holes inside the crumb. While that style is beautiful, it’s not always ideal for sandwiches or toast. Sandwich bread has different priorities.
Instead of giant holes and a tough crust, sourdough sandwich bread aims for:
- A soft and tender crumb
- Thin crust that’s easy to bite
- Even slices that toast beautifully
- Mild tangy flavor instead of strong sourness
- Flexible texture that works for everyday meals
To achieve that texture, this recipe uses:
- Milk instead of only water for softness
- Butter or oil for tenderness
- Honey or sugar for gentle sweetness
- A loaf pan for structure and shape
The sourdough starter still provides natural fermentation and depth of flavor, but the enriched dough creates a softer, more approachable loaf.
Ingredients
For the Dough
- 100 g active sourdough starter
- 300 g warm milk
- 30 g honey or sugar
- 30 g melted butter or neutral oil
- 9 g salt
- 500 g bread flour or unbleached all-purpose flour
Optional Additions
- 1–2 tablespoons milk powder for extra softness
- 25–50 g whole wheat flour for added flavor
- 1 tablespoon olive oil for more tenderness
Equipment You’ll Need
You don’t need professional baking equipment to make this loaf successfully. A few basic tools are enough.
- Large mixing bowl
- Kitchen scale
- Loaf pan (9×5 inch recommended)
- Clean towel or plastic wrap
- Oven
- Cooling rack
Using a kitchen scale is highly recommended because sourdough recipes are much more accurate when measured by weight instead of cups.
Step 1: Prepare Your Sourdough Starter
A healthy active starter is the heart of good sourdough bread. This recipe works best when your starter is strong, bubbly, and fully active.
Feed your starter around 4–6 hours before mixing the dough. A feeding ratio like 1:2:2 or 1:3:3 works well.
Your starter should look:
- Doubled or tripled in size
- Full of bubbles
- Slightly domed on top
- Light and airy
- Pleasantly tangy in smell
If your starter smells overly acidic or alcoholic, it may need another feeding before use.
An active starter helps the dough rise properly and creates that beautiful soft crumb texture.
Step 2: Mix the Dough
In a large bowl, combine:
- Active sourdough starter
- Warm milk
- Honey or sugar
- Melted butter
Whisk everything together until mostly smooth.
Next, add the flour and salt. Mix using your hands or a wooden spoon until no dry flour remains and a shaggy dough forms.
At this stage, the dough may feel slightly sticky, but that’s completely normal. Resist the temptation to add too much extra flour.
Cover the bowl and let the dough rest for 20–30 minutes.
This short resting period helps hydrate the flour and allows gluten development to begin naturally. It also makes kneading much easier later.
Step 3: Knead the Dough
After resting, knead the dough until it becomes smooth and elastic.
By Hand
Transfer the dough to a lightly floured surface and knead for about 8–10 minutes.
By Stand Mixer
Use a dough hook on medium speed for around 5–6 minutes.
The dough is ready when:
- The surface looks smooth
- It feels elastic
- It springs back when pressed gently
- It’s soft but not overly sticky
If the dough feels too wet at first, let it rest for 10 minutes instead of adding extra flour immediately. Gluten develops over time, and the dough often becomes easier to handle naturally.
Step 4: Bulk Fermentation
Place the dough into a lightly greased bowl and cover it.
Now comes the first rise, also called bulk fermentation.
Depending on room temperature and starter strength, this usually takes around 4–6 hours.
The ideal dough temperature is around:
- 75–78°F
- 24–26°C
During this time, the dough slowly ferments, develops flavor, and gains strength.
For even better structure, perform one stretch and fold halfway through the rise.
Signs Bulk Fermentation Is Complete
Your dough should:
- Roughly double in size
- Look smoother on the surface
- Jiggle slightly when shaken
- Hold a soft indentation when pressed
Patience matters here. Under-fermented dough creates dense bread, while properly fermented dough produces a soft and airy loaf.
Step 5: Shape the Dough
Once bulk fermentation is complete, transfer the dough onto a lightly floured surface.
Gently flatten it into a rectangle approximately the width of your loaf pan.
Now shape it carefully:
- Fold the top third downward
- Fold the bottom third upward
- Roll tightly into a log
- Pinch the seam closed
Tension is important because it helps create even slices and good oven spring.
Place the dough seam-side down into a greased loaf pan.
Step 6: Final Proof
Cover the loaf pan and allow the dough to rise again until the top sits about 1 inch above the rim of the pan.
This final rise usually takes 2–4 hours depending on temperature.
The dough is ready when it slowly springs back after being gently pressed.
Do not rush this step. Proper proofing is one of the biggest secrets to soft sandwich bread.
Overnight Option
If you want more flexibility, you can refrigerate the dough overnight after it has risen about halfway.
The next day, bake it directly from the refrigerator.
Cold fermentation also develops slightly deeper flavor.
Step 7: Bake the Bread
Preheat your oven to:
375∘F≈190∘C
Bake the loaf on the center rack for 40–45 minutes.
The bread is finished when:
- The top is golden brown
- The loaf sounds hollow when tapped
- Internal temperature reaches about:
200∘F≈93∘C
If the top browns too quickly, loosely cover it with foil during the final 10 minutes.
As the loaf bakes, your kitchen fills with that incredible warm buttery sourdough aroma that makes homemade bread so special.
Step 8: Cool Before Slicing
Once baked, remove the loaf from the pan immediately and transfer it to a cooling rack.
Allow the bread to cool for at least one hour before slicing.
This step is extremely important because the interior of the bread continues cooking while cooling. Cutting too early can lead to gummy texture and uneven slices.
When fully cooled, the loaf slices beautifully with a soft, fluffy interior.
Texture and Flavor
Texture
This bread has:
- Fine even crumb
- Soft slices
- Flexible texture
- Tender crust
- Excellent sandwich structure
Unlike rustic sourdough boules, it won’t shred your sandwich fillings or crack apart when sliced.
Flavor
The flavor is balanced and mild with:
- Gentle sourdough tang
- Slight buttery richness
- Light sweetness
- Warm fermented aroma
It tastes homemade in the best possible way.
Storage Tips
Homemade sourdough sandwich bread stays soft surprisingly well thanks to the enriched dough.
Room Temperature
Store in a bread bag or wrapped in a towel for 3–4 days.
Freezing
Slice first, then freeze for up to 2 months.
Toast slices directly from frozen whenever needed.
Avoid Refrigeration
The refrigerator dries bread out quickly and changes the texture.
Easy Variations
Whole Wheat Version
Replace 25–30% of the white flour with whole wheat flour.
You may need an extra splash of milk because whole wheat absorbs more moisture.
Extra Soft Sandwich Bread
For an even softer crumb, try adding:
- Milk powder
- Mashed potato
- Extra butter
These ingredients help retain moisture for longer.
More Tangy Flavor
To increase sourness:
- Extend bulk fermentation
- Refrigerate overnight
- Use a slightly more mature starter
Less Tangy Flavor
For a milder loaf:
- Shorten fermentation
- Use a younger starter
- Bake the same day
Final Thoughts
This sourdough sandwich bread is the kind of recipe that slowly becomes part of your weekly routine. It’s simple enough for everyday baking but rewarding enough to feel special every single time.
The beauty of this loaf isn’t flashy crust or giant holes—it’s reliability. It makes incredible toast, dependable sandwiches, buttery breakfast slices, and comforting late-night snacks.
As you bake it more often, you’ll stop relying only on timing and begin understanding the dough itself—how it feels, how it rises, and when it’s truly ready. That’s the moment sourdough baking starts feeling natural instead of intimidating.
And once you taste a fresh homemade slice still slightly warm from the oven, replacing store-bought sandwich bread becomes almost impossible.

Leave a Reply